MOLECULAR MODELING and MOLECULAR GRAPHICS.
The new version of StruMM3D is 10.0.0.56 (programme group updated on 01/14/2026).
Remember to visit the StruMM3D FAQ for hints, user/program tips and additional help. The FAQ is updated frequently. Check for new info.
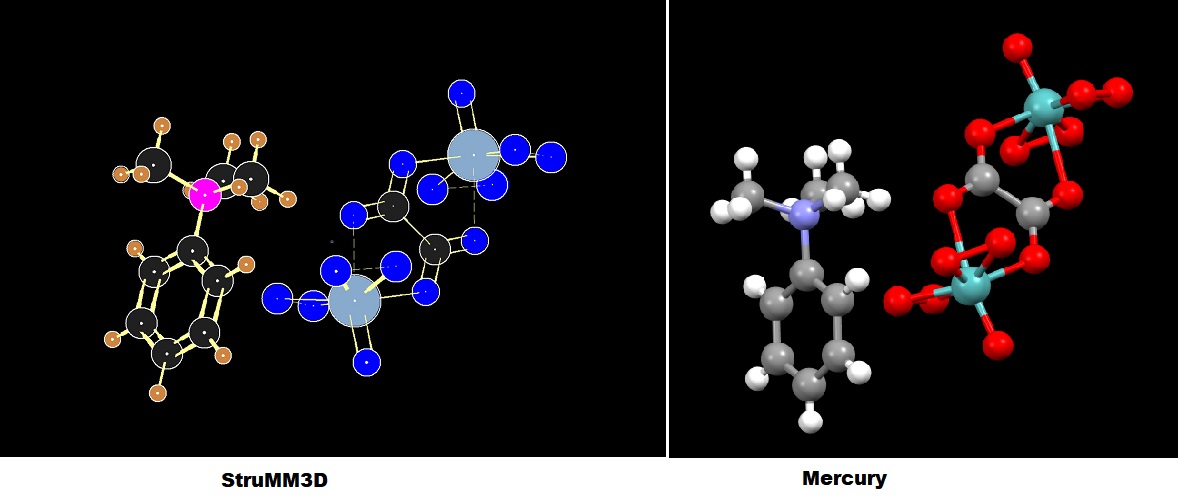
The molecular model from the x-ray crystallographic coordinate data (CIF) of Bis(trimethylphenylammonium) m-oxalato-bis[oxidodiperoxidomolybdate(VI)].
StruMM3D, using only atomic coordinates and types, without a human-generated connectivity list, or any other input, creates an information laden molecular model, whose image is shown.
Notice the revealed subtleties in bond types, bond length, delocalization, and other stereo-electronic data, when the structure is valence complete.
Charge and bonding data are color-coded into the StruMM3D images. Single to quadruple, and their delocalized bonds, are automatically recognized by StruMM3D's intelligent algorithms, and identified.
For example, single bonds with bond orders less than 0.5, appear as dashed lines, and with bond order less than 0.95 as green lines.
The image for the same molecule, generated by Mercury from the same CIF file, is also shown for comparison.
StruMM3D's molecular models can create molecular graphics for use in your daily tasks, presentations, reports and publications. StruMM3D can also be launched from the Graphical Thumbnails (bmp, jpg, gif) of it's models, a first among molecular modelers.
The use of the StruMM3D (© Vernon. G. S. Box, Ph.D.) downloadable version is currently unrestricted, but the program is still subject to our copyright. We retain all our rights, including those to restrict or deny access to all unpaid users, without advance notice. Some Updating Things For StruMM3D Users to do ASAP! No Internet? or Don't Want StruMM3D to Access the Internet? An Important StruMM3D Milestone! StruMM3D Update News StruMM3D was originally designed to be a teaching tool for undergraduate/graduate use. So, when StruMM3D is executed by a new user it will run in its "novice" mode (the moreinfo environmental flag will be M). StruMM3D is packed with neat features, and so it is highly recommended that a new user tolerate the additional information hints (a few extra click of the mouse) until one's familiarity with StruMM3D has grown. When desired, these information prompts can be dispensed with (main menu-utilities-program parameters click on M). Remember that StruMM3D will create shortcuts to StruMM3D.Exe and StruMM3DX.Bat on your desktop from the Main Menu, HELP option. Use the StruMM3DX shortcut routinely since it minimizes the intrusion of the Microsoft UAC annoyance.
Increasingly we have seen the Microsoft security protocols preventing the Str3Di programs from running as they should. This is a permissions problem that affects even some of Microsoft's older non-system software, like when you try to open a command prompt. We advise all users of StruMM3D to use Windows File Explorer to open the \Str3Di folder, to right click on the StruMM3D.Exe file, select properties, then select Compatibilty, and then to check the box that says "Run this program as an administrator". Repeat this sequence for all of the Str3Di Exe files whose names start with "str".
Many of the users of StruMM3D do not have constant access to the internet and so we have made the updating process user-initiated via the "HELP" option on the StruMM3D main menu. This allows the user to opt for an auto-update, or a manual update, whenever online.
The bug (a typo) in the algorithm that generates StruMM3DX.Bat and caused problems closing StruMM3D was fixed on 03/16/2025. You should delete the current version of StruMM3DX.Bat, kept in the \Str3Di folder, before running/executing the new updates, then launch StruMM3D.Exe from the StruMM3D shortcut, or directly from the StruMM3D.Exe file in \Str3Di, or by clicking on any structure data file to start a modeling exercise. StruMM3D will recreate the desired StruMM3DX.Bat file into the \Str3Di folder.
Using StruMM3DX.Bat is of critical importance. We strongly suggest that users only launch StruMM3D.Exe using StruMM3DX.Bat, or it's shortcut which StruMM3D will make for you from the main menu, in order to facilitate future updating processes. These updates do occur occasionally and can be important. If you do not use StruMM3DX.Bat, or its shortcut, then StruMM3D will only automatically download the StruMM3DUpd.Exe file into \Str3Di, which is also available on this page, and you must manually update StruMM3D from that self-extracting archive.
StruMM3DUpd.Exe is a 7zip self-extracting archive of recently updated StruMM3D files. Save it to the folder \Str3Di and click on it. Accept all the overwrites if asked, the (A)lways option. The most recent updates to files used by StruMM3D, and minor updates of StruMM3D, are stored in StruMM3DUpd.Exe. StruMM3D will normally automatically get this download for you and store it in the folder \Str3Di. Look for it in \Str3Di if you do not use StruMM3DX to start/run StruMM3D.
The covalent radius database for metals and some other atoms, used by StruMM3D, is now being re-examined and refreshed in the light of recent developments linking bond type to bond length and their quantization. Few changes are envisoned, but those that occur will be important. This covalent radius database file, along with any other newly updated helper files for StruMM3D, can be obtained from this StruMM3DUpd.Exe download.
The document StruMM3DComLine.Dat has a listing of most of the programme's "paramenter switches", it is well worth reading. You should implement these parameter changes very sparingly and carefully. Only make changes that are really necessary, including the one to block the programme from seeking internet access. However, if you don't have access to the internet and/or face slow starts, just add "~ nowww 0", without the quotation symbols, to the last line of StruMM3DComLine.Dat.
The Quantized Valence Bond Molecular Mechanics (QVBMM) force field is founded on the notion that all bond types are quantized, and that the length of any bond must be indicative of it's quantized bond type and hence bond order. StruMM3D uses this force field, and has facilitated the reviewing of the bond type/bond length data for tens of thousands of x-ray crystallographically determined structures, organic, organometallic and inorganic.
35 Years after the creation of the QVBMM force field, for every high resolution diffraction determined structure (excluding those with disordered atoms) examined using StruMM3D, there has never been one case of a violation of the quantized bond type/bond length idea. There is now a non-statistical, rigorous mathematical relationship between bond length and bond type that emphasizes the non-continuous, quantized, nature of bond states.
If you seem to be missing a copy of the file MSCOMCTL.OCX from your system, then there is a copy in the updating file StruMM3DUpd.Exe, whose download link is below. Remember that MSCOMCTL.OCX must be placed in C:\Windows\SysWOW64.
Remember to visit the StruMM3D FAQ for hints, user/programme tips, and additional help. The FAQ is updated frequently and always has new interesting information.
Some users just don't take the time to change the names of their molecular models after they have modified their structures. This brings chaos to the saving of the coordinate data for molecular models. We are trying to make the process more friendly, especially if the StruMM3D environmental parameter "T" (autosave temporary structure data files on structure change) is set. StruMM3D will nudge you to rename and resave the current structure if changes have been made.
If you make any change to the model in a working folder, to prevent the overwriting of old data immediately, it will be automatically saved into \Str3Di\Temp, with an included _temp designation. These files temp are useable, can be renamed, and re-saved (but remove the 'temp' designation) into other folders. StruMM3D does not save any file with "_temp" in its name to any other folder than \Str3Di\Temp.
The release of the version 9.0.0.1, of StruMM3D, marked the move towards a more graphical usage of StruMM3D. This, and subsequent, version will dramatically reduce file storage space used, if we remember that the folders \Str3Di\data and \Str3Di\xray are storage/backup folder and should not be used as working folders. Users should create appropriately named folders in \Str3Di\projects for their projects and these folders will enjoy full access to the new graphical features.
StruMM3D maintains a comprehensive database of molecules that have been viewed/examined/manipulated. StruMM3D must examine this database periodically to keep it up to date, verify the validity of the entries, and remove deleted molecules. This is all done when you log off, or exit from the program, but in the background, allowing you to do something else with your computer and time. So, we ask you to give StruMM3D a few minutes to complete it's chores, especially if you have a large database of molecules.
StruMM3D normally measures molecular (steric, torsional, dipolar) strain energy. Algorithms that link bond orders (and bond lengths) to the efficiency of delocalization in simple conjugated pi-systems, while present in StruMM3D's code, had not previously been made available to the user. It has been the foremost belief that if molecular strain can adequately reflect, and account for, molecular stability and reactivity, then this would minimize the instances in which quantum chemical assumptions need to be used, and so force users to face the reality that much of quantum chemistry has only very narrow and specific applications.
Indeed, over the years it has been demonstrated that many complex stereo-electronic phenomena in organic chemistry, like the anomeric effects, can be explicitly and completely explained by looking at molecular stereo-electronic strain energy rather than by invoking obscure and specious implementations of delocalization theory promoted by some quantum chemistry calculations.
We have developed algorithms for predicting, and using, the best covalent radius size for metal ions in their complexes. This is an extremely important area because the use of inappropriate covalent radii has lead to researchers claiming the existence of metal to metal quadruple and quintuple bonds, sometimes where none actually exist. Many of these debacles are instigated by quantum chemists. Usually, in normal chemistry, the greater the order of a bond, the shorter it is. However in quantum chemistry, quadruple bonds can have the same lengths as double bonds and maybe even single bonds, or longer. Go figure!
Indeed, when one adjusts the covalent radius of the metal atom, manually and user interactively, from oxidation state 0 to whatever, often very surprising structural and stereo-electronic features of the complex become apparent, especially in the metal to metal and metal to ligand bonding features. When more than one viable covalent radius choice is possible, one can often see why one is preferred by looking at the metal to ligand bonding features, especially bond orders. It is very instructive to look at the structures of metal complexes with the CCDC's Mercury and then with StruMM3D. The complexity of this field is still apparent. We have continued to refine our this metal ion covalent radius algorithm and the most recent update, embedded in the StruMM3D versions 8.4.0.66 and later, have been frequently reviewd, and updated, so that they now performed very well.
More News
StruMM3D now plays smaller MP3 audio files instead of WAVs.
Peroxides are important, biologically active molecules, but the peroxide bond is still unappreciated. A report is available at DOI: 10.13140/RG.2.2.21539.96803
Copy any CIF file into the \Str3Di folder to change the start-up molecular display. The first CIF found is the first CIF used (no libraries, please).
StruMM3D is tweaked and updated regularly. Current users of StruMM3D will notice that the update file, StruMM3DUpd.Exe, is now, from Version 8.0.0.35, automatically downloaded into \Str3Di folder, whenever your desktop has an internet connection and the version of StruMM3D in use needs to be updated. If you are using an old version of StruMM3D and the download does not occur, then manually download this program update, and follow the updating instructions given below.
Some users will prefer to execute the update to their StruMM3D program manually. They will open a command prompt (DOS) window and enter (without the quotes) -
"X:\str3di\StruMM3DUpd.Exe -y"
where X: is either the drive onto which the str3di folder has been installed, like E:, if the installation was into drive E: and created E:\Str3Di, or the full path to the folder that contains the subfolder str3di, like E:\chemistry. If prompted by the updater, make sure to unzip all the contents into the folder \Str3Di.
The rest of us, who wisely wish use the convenience of the auto-updater, would have used the batch file StruMM3DX.Bat to load and run StruMM3D. This batch file is always present in the \Str3Di folder. After your molecular modeling session has ended a new window will appear in order to execute the updating process, just follow the prompts to unzip the update contents into the home folder, \Str3Di, then close. If this batch file does not perform as is expected, then simply delete it and StruMM3D will build a newer version.
We continue to extend special thanks to the dedicated users of StruMM3D who have helped us to identify programme issues, and suggest improvements. StruMM3D bugs are getting harder to find, but sometimes we introduce the critters unintentionally while trying to polish inter-dependent algorithms. So, if you do find a bug, or have a suggestion, then contact us, please.
The downloadable version is the complete and fully capable version of the powerful StruMM3D molecular modeler, but the software is copyrighted, all rights are reserved. StruMM3D can handle up to 10000 atoms and lone pairs (5000 per structure), and faster computers are better. All queries and assistance must be obtained from Exorga, Inc. Contact us anytime.
StruMM3D_Setup_Files.Exe is a complete installation of StruMM3D that you can install as is described below. It creates a new folder, \Str3Di, that has all the bits and pieces necessary for an immediate use of the program, again, as is described below. This new installation mode now includes features that allow users, plagued by the Microsoft UAC bug, to run StruMM3D unimpeded, even with the UAC feature enabled at its most restrictive level.
Users of Str3Di32 -
Str3Di32 is no longer supported. We strongly recommend that you replace your installation with a new StruMM3D package.
New Users of StruMM3D -
We must recommend that you do NOT try to install StruMM3D into the "Program Files (x86)" folder, found on drive C: of Windows 7 through 10. Instead, try to install StruMM3D into any other drive than drive C:, or create a new folder in drive C:, like C:\MyPrograms or C:\Chemistry, and install StruMM3D there. Windows is increasingly denying write access to the "C:\Program Files" folders, and this is preventing many third-party programs from functioning properly.
Download the StruMM3D_Setup_Files.Exe file onto your desktop, or into some folder you can find easily, like C:\Temp. In Windows 7/8/8.1/10, very few non-system executables work well if not initiated by using the “Run as Administrator” option, so, now, right click on StruMM3D_Setup_Files.Exe, select “Run as Administrator”. When it asks where to put the files, instruct it to place the files into your selected drive, like C:\Temp, where you can find them easily.
The folder you selected to contain the setup files will contain a batch file named INSTALL.BAT. If you find Install.Bat and simply left_click on it, it will reveal it's usage mode at the bottom of the file, and that will enable you to select where to install the program.
Right_click on the Windows START button, open an admin command prompt window, and navigate to the folder with the setup files. At the command prompt, if you enter Install X: (note the space), this will install the StruMM3D program into X:\Str3Di. If you enter Install X: \AnyFolder (again, note the space after X:) this will install the StruMM3D program into X:\AnyFolder\Str3Di. Just follow the prompts.
Use Windows Explorer to open the folder c:\programdata. You should see a sub-folder \Str3Di and in that folder a file Str3Didrive.dat. Use NotePad to open that file. The third line of that file should have the name of the folder into which you installed StruMM3D. So if you had used the command line, above, Install X: \MyChemistry, to install the StruMM3D program, then this should say X:\MyChemistry (Note that there is no space in this address). If it just says X:, or C:, then change it.
If you have problems getting a clean installation, then download the file Str3DiSrc.EXE, place this file into the directory you wish to execute StruMM3D from and click on it. A fully functioning installation will then be created, but you might have to tweak the C:\ProgramData\Str3Di\str3didrive.dat file to reflect the path to this installation.
The newly created installation sub-folder X:\MyChemistry\Str3Di, or whatever, will contain all the files you need. One new bonus is the presence of the new file StruMM3DX.Bat in the \Str3Di folder. When you run StruMM3D and use the main menu's HELP sub menu to create the shortcuts you'll need on the desktop, one of these shortcuts will be for StruMM3DX, the other for StruMM3D.
If you execute StruMM3D by using/clicking on the StruMM3DX shortcut then it will be unimpeded by the MicroSoft UAC screwup and will take care of update automatically, so do use it. You can also associate the StruMM3D files with StruMM3DX by executing, from a command window/prompt, the file assocstrx.bat.
Current users of StruMM3D -
Look in the \Str3Di folder for the file StruMM3DUpd.Exe. If it is absent, then you should download the StruMM3DUpd.Exe package only (updated 01/30/2022). This self-unzipping archive zip contains a generic copy of Str3Didrive.dat, new support program, and database, updates, and new additions to the StruMM3D working environment, including help with the command line options.
Copy the StruMM3DUpd.Exe into the \Str3Di directory, and then launch this self-unzipping archive as is described above. Before you run the updated program, ensure that you delete the file StruMM3DX.bat from the \Str3Di folder. It will be replaced after the update is launched.
If you have any issues during the next execution of StruMM3D, then delete the old program environment data file, STR3DISPLAY, whatever the file extension, and the current file StruMM3DX.bat, both from the \Str3Di folder..
Click here to download StruMM3DUpd.Exe now (revison date 01/14/2026, the download size is about 892 Kbytes). The StruMM3D.EXE program is about 1064 Kbytes.
Click here to download the Installation file – StruMM3D_Setup_Files.Exe (the download size is about 3466 Kbytes, and it includes all the files and DLLs needed to run StruMM3D, utilities, templates, WAV files, and others).
These self-extracting zipped files contain all the supporting programs for the StruMM3D program. All of the needed DLLs (that are normally supplied by the Windows OS but might be missing from your computer), the help file (program manual), many template molecular structure files, and other non-essential (but convenient) support files, are also included.
REMEMBER, if you have any installed version of STR3DI32 on your computer, this version is no longer supported and will not be compatible with the new features implemented in StruMM3D. Please ensure that you erase ALL of the old files in \Str3Di, NOT the sub-directories or sub-folders. Keep all the data files in their current folders. Install StruMM3D and any new version of this software in \Str3Di. If your installation is not on drive C:, then remember to ensure that the C:\ProgramData\Str3Di\Str3DiDrive.Dat file is properly configured and is "pointing" to the home directory/folder of the StruMM3D.Exe file, before the first execution of StruMM3D, see above.
By now, most users of StruMM3D will know that the program will play various sound files, depending on the context. These sound files (in the MP3 format) can be downloaded here. You can also make your own sound files to replace the default sound that come with StruMM3D, but they have to be in the MP3 format, and you have to name them like those in \Str3Di\Waves in order to get StruMM3D to recognize them. If you have a favourite work background music/sound, then name this music/sound "mood_whatever.mp3" (where whatever is the name you use to identify the audio file) and put it into the Wave folder. StruMM3D uses the small, but extremely capable, open source, music player CoolPlayer.Exe, to play the sounds/music.
Users of Windows Vista/7/8/8.1/10, will already have the required DLLs in their C:\Windows\System32 folder. Most computers will already have these DLLs in C:\WINDOWS\SYSTEM, C:\WINDOWS\SYSTEM32, or C:\WINNT\SYSTEM32. However, if you have the Windows Vista OS, or when you try to run StruMM3D you get an error message about a missing DLL, then download this VBRUN60SP6.EXE, copy it to your SYSTEM32 folder (see above) and unzip the file there. If you are only missing VB6 run-time files, these are available in the run-time library for VB6, vbrun60sp6.exe. Just download it and run/open it.
Click VBRUN60SP6.EXE to download the run-time files for VB6 (about 1005 K). Once you have the file, just click on it and the VB6 run-time files will be installed into your computer. Users of Windows 7 or 8 should right click on the executable (EXE) file, select properties, select compatibility, and then select “Run this program as an Administrator”.
StruMM3D needs a file named STRLOGO.LXS, for its proper functioning. If there is a crash during the first execution of StruMMD it could be because the critically important file STRLOGO.LXS was not found in the folder \Str3Di. There is a copy of this file in the folder \Str3Di\Data and so you can use Windows Explorer to copy the file into the \Str3Di folder. Also put a copy into \str3Di\Backup while you're at it.
StruMM3D also needs a file named Str3DiDrive.Dat, for its proper functioning. This file is included in all installation packages, and should have been installed into Drive C:\ProgramData\Str3Di after your first use of StruMM3D. If your installation tells you that it is missing, look for a duplicate in the installation folder, X:\Str3Di where the program is installed. If this file is missing from X:\Str3Di then you can get a copy from StruMM3DUpd.Exe, above, and place it in X:\Str3Di. Follow the instructions described above (New Users).
You are encouraged to place a shortcut to StruMM3D on your desktop. While executing, StruMM3D, click on HELP in the main menu, and then there is an option to place a shortcut onto your desktop. Do that. Otherwise, open Windows Explorer, navigate to the \Str3Di directory, right-click on the file StruMM3D, and select the option to create the shortcut, then drag the shortcut to the desktop.
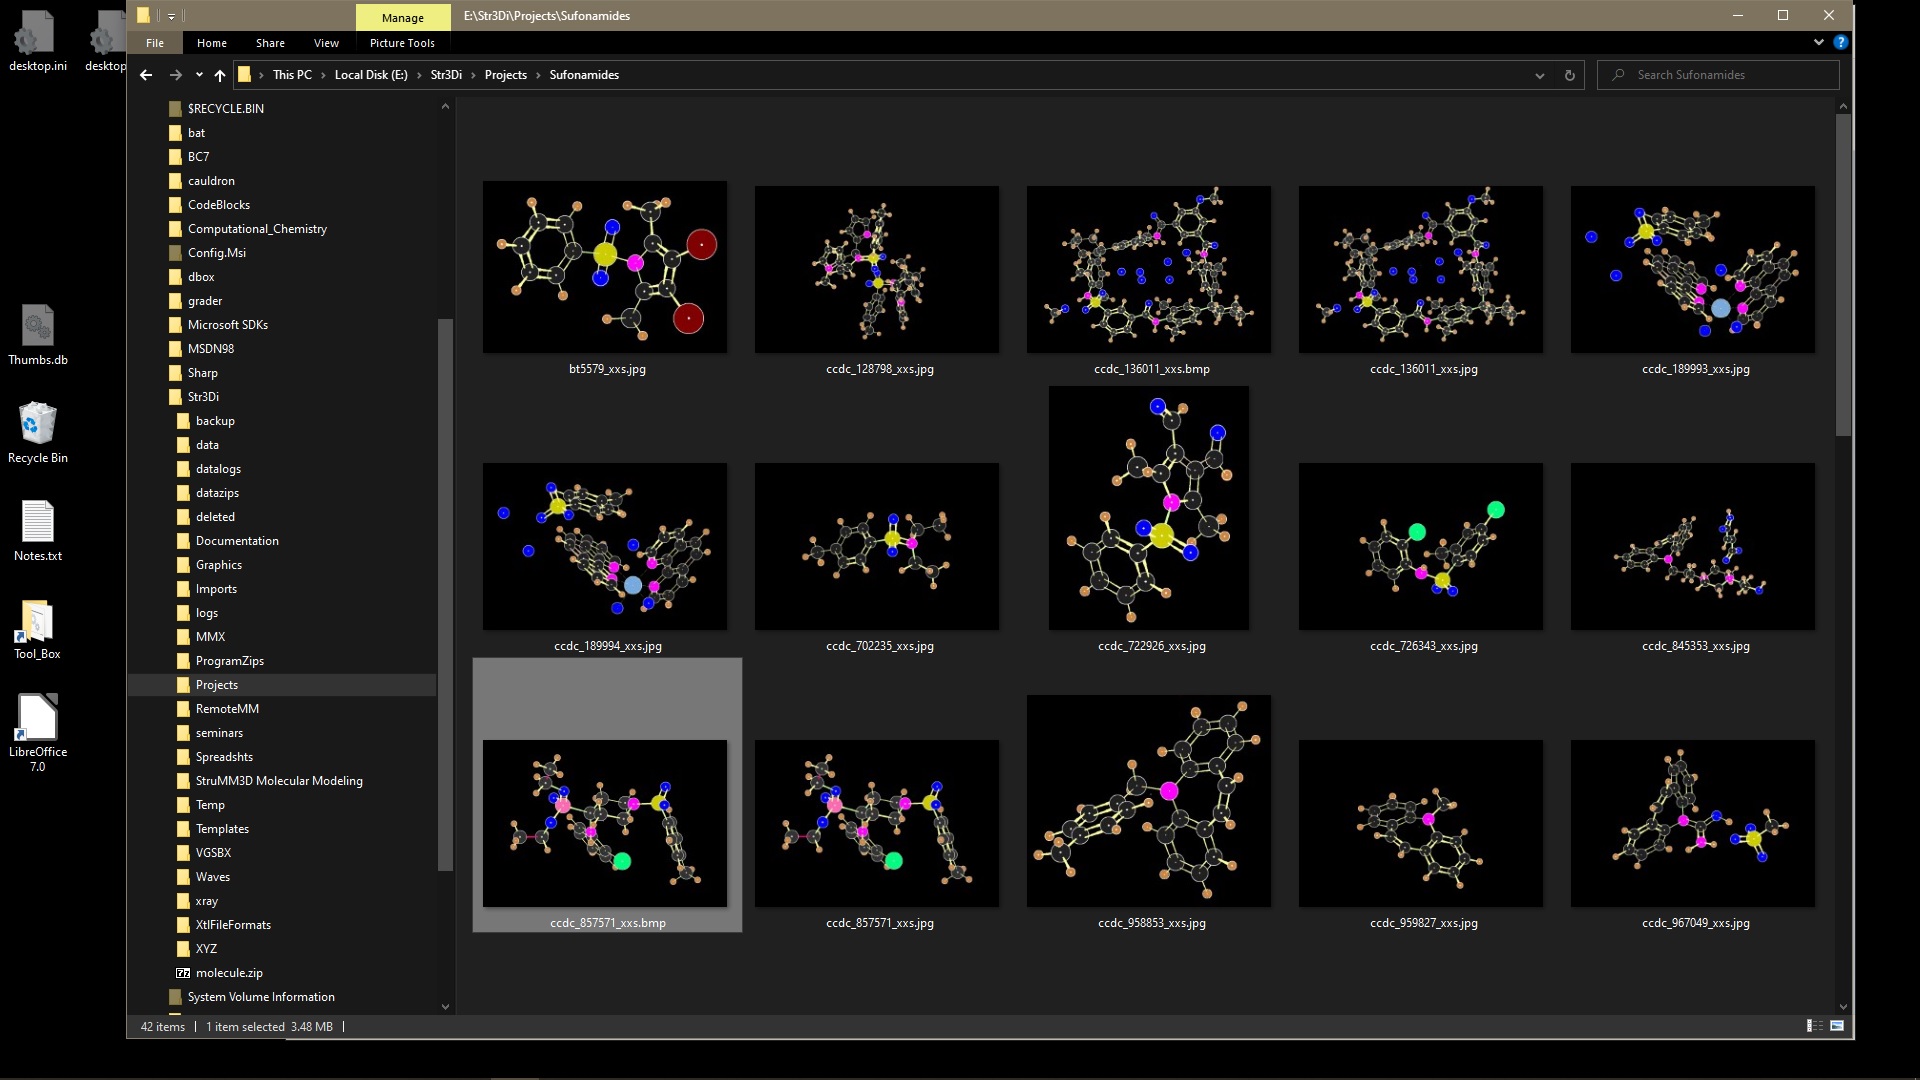
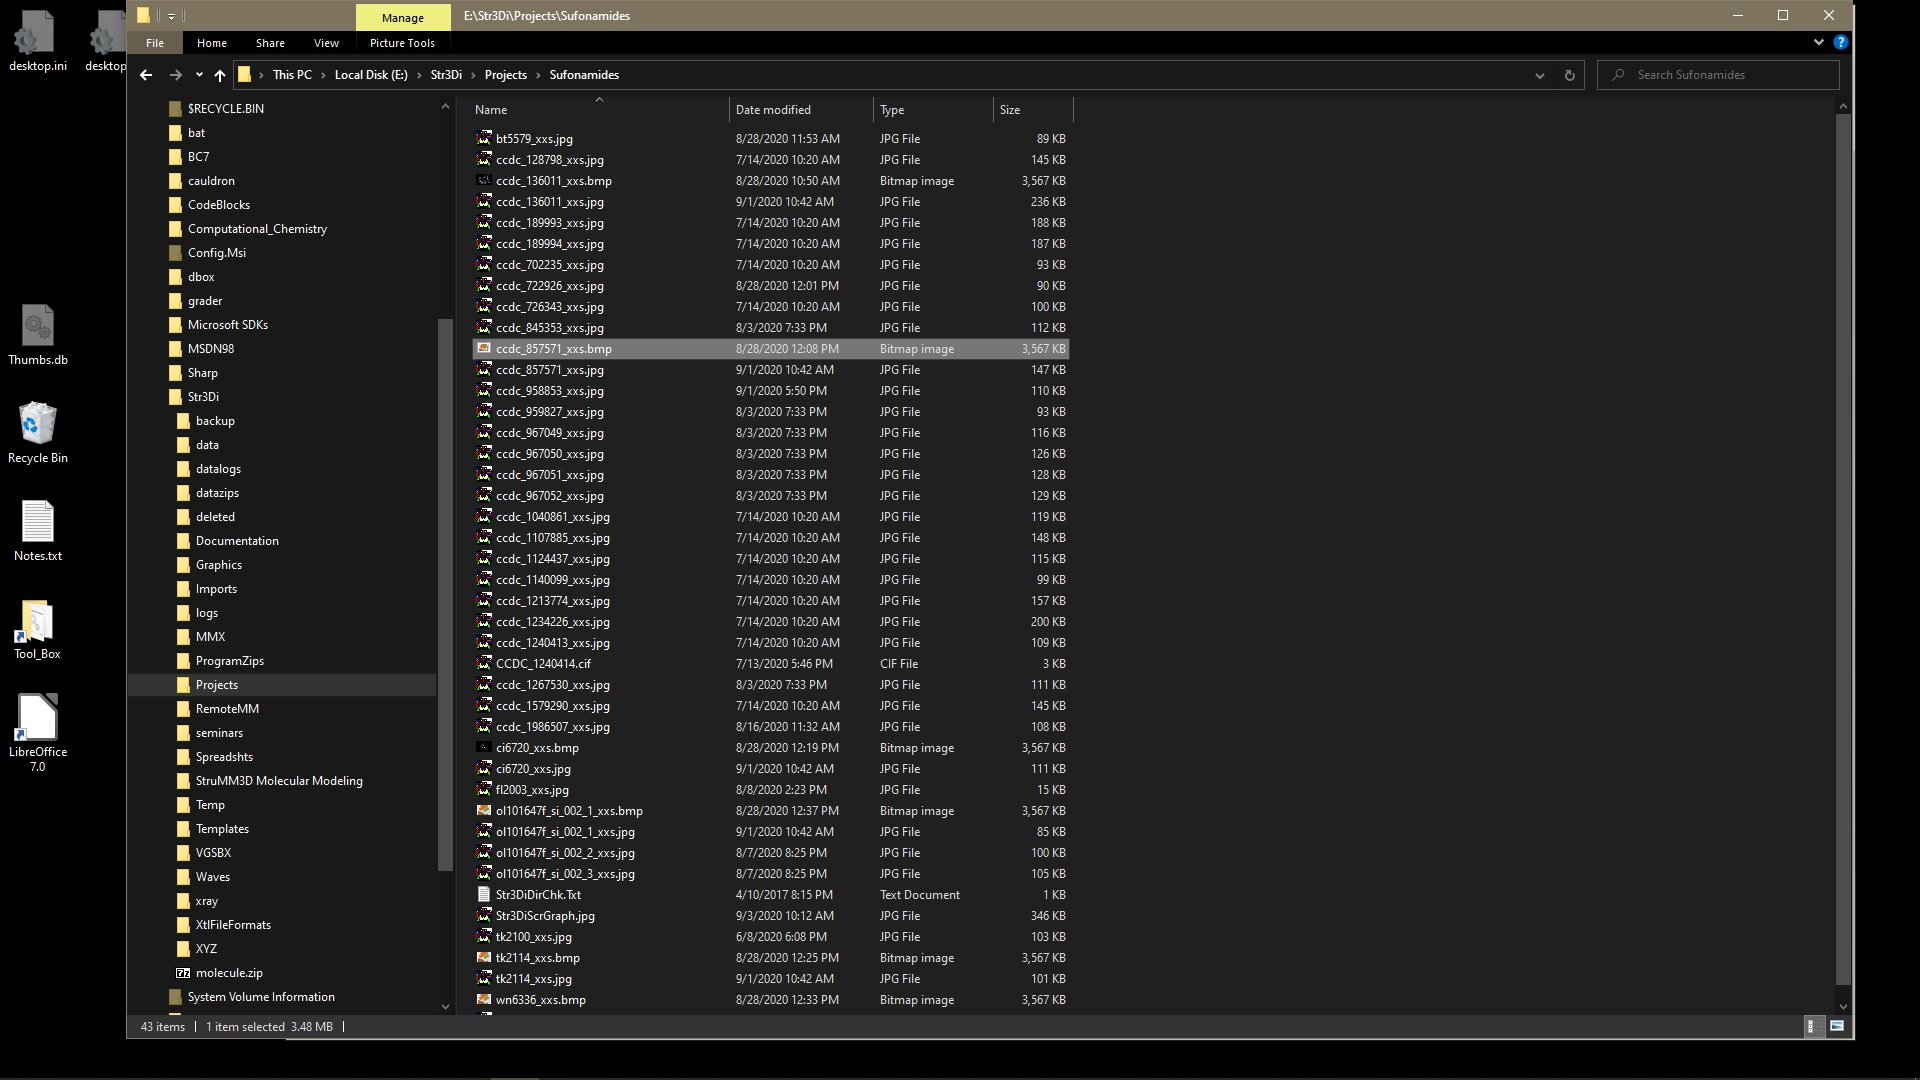
Launch StruMM3D from the Molecular Grahics Thumbnails
When using StruMM3D, it automatically saves a graphic of the molecule you just loaded, into the current working directory, unless you forbid it. You can also save a graphic of the current image to the clipboard (there are three ways to do this within the program), and this simultaneously places that image, as a JPG or BMP file, into the current working directory and into the directory \Str3Di\Graphics, overwriting the older images of the same molecule. You can use this graphic in your publications/documents etc.. If you view the folder using Windows Explorer, you can see these thumbnails (Windows makes them from the BMP, GIF, or JPG file) and these thumbnails show the molecules in glorious detail and color. or this
So, if you so you wished, you could have a totally visual/graphic display, in Windows Explorer, of all the molecules processed by StruMM3D!
If image capturing is somehow disabled, all you need to do is to enter the command "~ jpgbmp 1" into the Data I/O Box when StruMM3D is idle, once. The process can be discontinued by entering "~ jpgbmp 0" into the I/O Box when StruMM3D is idle, and remember to omit the quotations.
StruMM3D now captures images as JPG files, the default. If you want BMP files then enter the command "~ img 1" into the Data I/O Box when StruMM3D is idle, or add this command to the end of the file StruMM3DComLine.Dat. The command "~ img 0" makes JPG files the default again.
As of Version 8.2.0.10, if you right click on a thumbnail, select "open with" from the menu, and direct the PC to use StruMM3D, then the molecular modeling of the selected structure will begin. After the first run the PC will make the necessary adjustments and subsequent usage will be easier. In older versions of StruMM3D, the graphics file must be in the same folder as the stucture data file.
StruMM3D, from version 8.2.0.10, has now become the first totally graphical molecular modeling tool, and one needs not try to remember which structure data file name corresponds to which structure. You can see them.
Remember that StruMM3D only backs up all the graphics files into the directory \Str3Di\Graphics, as well as into the directory with the structure data files. So, if you have been using data from the directory \Str3Di\Data, the thumbnails will also be saved there (automatically), as JPG or BMP files, and that is where best to use Windows Explorer to view and select the thumbnail you want to use to start a molecular modeling exercise.
StruMM3D will use any graphics file in the formats BMP, JPG, or GIF, but it can only create JPG and BMP files. Having a lot of high resolution BMP files on your drive takes up a lot of space, but you can convert them to smaller JPG or GIF files since StruMM3D will also use these files. We recommend using the open source program "Magick" in the ImageMagick Software package to convert your BMP files to JPG files. If you want StruMM3D to facilitate this conversion for you, using ImageMagick's Magick or Convert, write to us and we'll show you how.
So, you are searching for a molecular structure using Microsoft File Explorer, would you rather see -
If you have any trouble, with the installation, or the software, just send us an e-mail, to customer support, so that we can assist you.